Lights
此筆記對應官方文件 Lights 章節。
在開始之前我們先在 Three 環境內加上 OrbitControls 讓我們能用滑鼠拖曳調整相機視角。
import {OrbitControls} from '/examples/jsm/controls/OrbitControls.js';
controls.target.set(0, 5, 0);
controls.update();
OrbitControls 有個 target 中心點,當我們拖拉調整視角時,都是圍繞在這個中心點。
另外有相關屬性變更時也要呼叫 controls.update() 讓更新生效。
其餘部分可依照官方文件所述建置一個方便我們觀察各種 Lights 的環境。
AmbientLight
const color = 0xFFFFFF;
const intensity = 1;
const light = new THREE.AmbientLight(color, intensity);
scene.add(light);
最不像真實光的光 XD,intensity 是設置光的強度,把 AmbientLight 加進場景後,此光會平等的照亮所有地方,故物件也沒有陰影相關的顏色變化。
HemisphereLight
const skyColor = 0xA1EE11;
const groundColor = 0xB1A1FF;
const intensity = 1;
const light = new THREE.HemisphereLight(skyColor, groundColor, intensity);
scene.add(light);
相比 AmbientLight,HemisphereLight 多了設置天地色,會將物件的顏色在天地色之間做倍增 (multiplies)。
物件朝上的面會被 skyColor 影響較多,反之朝下的面會被 groundColor 影響較多。
DirectionalLight
此光源經常拿來模擬太陽光,會從光的位置朝 target 射出無窮距離的光線。
const color = 0xFFFFFF;
const intensity = 1;
const light = new THREE.DirectionalLight(color, intensity);
light.position.set(0, 10, 0);
light.target.position.set(-5, 0, 0);
scene.add(light);
scene.add(light.target);
此光源多了 target 屬性,代表光源會朝向 target 的位置照射。
LightHelper
像 DirectionalLight 這種光在場景中沒辦法直接看到實體位置,故我們可以引入 DirectionalLightHelper 幫助我們可看到光源的輔助線
const helper = new THREE.DirectionalLightHelper(light);
scene.add(helper);
另外要提到的是,若是像官方文件這樣需要動態變動 LightHelper 的位置的狀況時,記得要呼叫 helper.update() 讓更新生效。
PointLight
一種點光源,會從該點向四面八方射出光線,所以沒有 target。
const color = 0xFFFFFF;
const intensity = 1;
const light = new THREE.PointLight(color, intensity);
light.position.set(0, 10, 0);
scene.add(light);

const helper = new THREE.PointLightHelper(light);
scene.add(helper);
而 PointLight 有個 distance 屬性,預設是 0,代表光源影響的極限距離為無窮遠,而大於 0 時代表光源影響至該距離為止,不管距離為何,離光源越遠,亮度皆會減弱。
SpotLight
const color = 0xFFFFFF;
const intensity = 1;
const light = new THREE.SpotLight(color, intensity);
scene.add(light);
scene.add(light.target);

const helper = new THREE.SpotLightHelper(light);
scene.add(helper);
聚光燈,照射範圍從光源位置呈現出圓錐狀,由於不是朝四面八方散射,所以需要 target 來決定要朝哪邊聚光。
實際上有兩個同心圓錐,外層和內層,外層至內層的範圍光線強度會從 intensity 遞減到 0。
其他屬性還有:
distance
決定圓錐的高度,跟 SpotLight 的 distance 作用一樣,都是決定光最遠能照射的距離。
angle
決定圓錐狀的散射角度
penumbra
決定外內層的距離,0 代表內外層重疊,此時在光照範圍的邊緣會有很明顯的色差。
1 代表從圓錐中心點開始亮度衰減。
0.5 代表從圓錐中心點與外層圓錐邊緣的中心開始亮度衰減。
RectAreaLight
RectAreaLight 只會在 MeshStandardMaterial 和 MeshPhysicalMaterial 上有效果。同時此光源有 width、height 屬性定義光源本身的長寬,效果很像辦公室或教室天花板的矩形平面燈。
官方文檔在這邊引入了 RectAreaLightUniformsLib 原因是 If you forget the data the light will still work but it will look funny so be sure to remember to include the extra data.
個人好奇會有多 funny 所以測試了一下,以下程式碼為沒有 RectAreaLightUniformsLib 的版本:
import * as THREE from 'three'
import './style.css'
import { OrbitControls } from 'three/examples/jsm/controls/OrbitControls'
import {RectAreaLightUniformsLib} from 'three/examples/jsm/lights/RectAreaLightUniformsLib.js';
import {RectAreaLightHelper} from 'three/examples/jsm/helpers/RectAreaLightHelper.js';

const scene = new THREE.Scene();

{
  const planeSize = 40;
  const loader = new THREE.TextureLoader();
  const texture = loader.load('checker.png');
  texture.wrapS = THREE.RepeatWrapping;
  texture.wrapT = THREE.RepeatWrapping;
  texture.magFilter = THREE.NearestFilter;
  const repeats = planeSize / 2;
  texture.repeat.set(repeats, repeats);

  const planeGeo = new THREE.PlaneGeometry(planeSize, planeSize);
  const planeMat = new THREE.MeshStandardMaterial({
    map: texture,
    side: THREE.DoubleSide,
  });
  const mesh = new THREE.Mesh(planeGeo, planeMat);
  mesh.rotation.x = Math.PI * -.5;
  scene.add(mesh);
}

{
  const cubeSize = 4;
  const cubeGeo = new THREE.BoxGeometry(cubeSize, cubeSize, cubeSize);
  const cubeMat = new THREE.MeshStandardMaterial({color: '#8AC'});
  const mesh = new THREE.Mesh(cubeGeo, cubeMat);
  mesh.position.set(cubeSize + 1, cubeSize / 2, 0);
  scene.add(mesh);
}

{
  const sphereRadius = 3;
  const sphereWidthDivisions = 32;
  const sphereHeightDivisions = 16;
  const sphereGeo = new THREE.SphereGeometry(sphereRadius, sphereWidthDivisions, sphereHeightDivisions);
  const sphereMat = new THREE.MeshStandardMaterial({color: '#CA8'});
  const mesh = new THREE.Mesh(sphereGeo, sphereMat);
  mesh.position.set(-sphereRadius - 1, sphereRadius + 2, 0);
  scene.add(mesh);
}

{
  const color = 0xFFFFFF;
  const intensity = 5;
  const width = 12;
  const height = 4;
  const light = new THREE.RectAreaLight(color, intensity, width, height);
  light.position.set(0, 10, 0);
  light.rotation.x = THREE.MathUtils.degToRad(-90);
  scene.add(light);

  const helper = new RectAreaLightHelper(light);
  light.add(helper);
}

const canvas = document.querySelector('#c');
const renderer = new THREE.WebGLRenderer({canvas: canvas, antialias: true});
renderer.setPixelRatio(window.devicePixelRatio)

const camera = new THREE.PerspectiveCamera(40, canvas.offsetWidth / canvas.offsetHeight, 0.1, 100);
camera.position.set(0, 10, 20);

const controls = new OrbitControls(camera, canvas);
controls.target.set(0, 5, 0);
controls.update();

function resizeRendererToDisplaySize(renderer) {
  const canvas = renderer.domElement;
  const width = canvas.clientWidth;
  const height = canvas.clientHeight;
  const needResize = canvas.width !== width || canvas.height !== height;
  if (needResize) {
    renderer.setSize(width, height, false);
  }
  return needResize;
}

function render() {
  if (resizeRendererToDisplaySize(renderer)) {
    const canvas = renderer.domElement;
    camera.aspect = canvas.clientWidth / canvas.clientHeight;
    camera.updateProjectionMatrix();
  }

  renderer.render(scene, camera);

  requestAnimationFrame(render);
}
render();
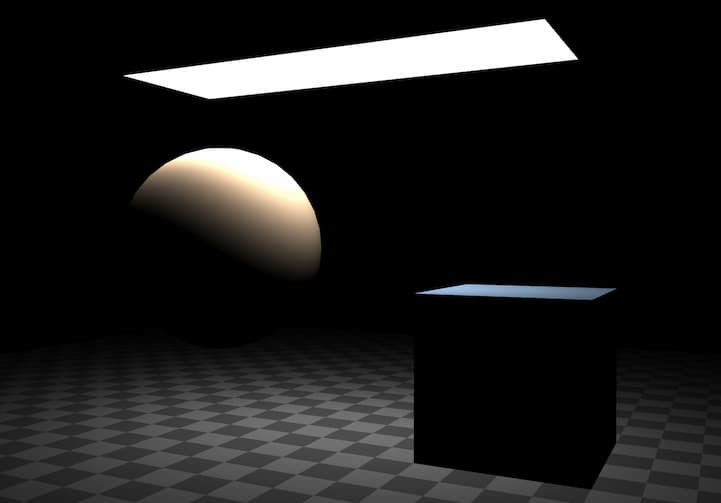
實際看起來還好 XD,看不出有哪裡怪的地方。
接著我們也引入該 RectAreaLightUniformsLib 且執行 init:
+ import {RectAreaLightUniformsLib} from '/examples/jsm/lights/RectAreaLightUniformsLib.js';
...
+ RectAreaLightUniformsLib.init();
加完這段後實際看也看不出哪裡有變化 XD。
RectAreaLight 沒有 target,取而代之的是 rotation,用來定義光線要朝哪個角度照。
physicallyCorrectLights
WebGLRenderer 底下有個 physicallyCorrectLights 屬性,預設是 false 不會啟用,一旦啟用將會依照真實物理光計算光隨距離衰減的變化,只會影響 PointLight 和 SpotLight,RectAreaLight 則本身就是這樣計算了。
+ renderer.physicallyCorrectLights = true;
而啟用此計算方式後,會有兩個屬性可設置來模擬真實物理光源:power 和 decay。
power 表示此光源的瓦數,像真實電燈泡那樣。
decay 表示隨距離減弱多少。
Performance
要注意場景中的每個光源都會減慢 three.js 渲染場景的速度,因此應該在達成目標效果內盡量使用少量的光源。